Getting Started With Amazon EC2
Overview
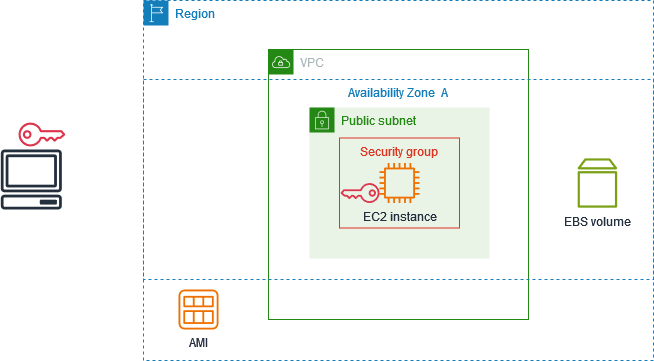
The following diagram
shows the key components:
• An image- A template
that contains the software to run on your instance, such as the operating
system.
• A key pair- A set of
security credentials that you use to prove your identity when connecting to
your instance. The public key is on your instance and the private key is on
your computer.
• A network- A virtual
private cloud (VPC) is a virtual network dedicated to your AWS account. To help
you get started quickly, your account comes with a default VPC in each AWS
Region, and each default VPC has a default subnet in each Availability Zone.
• A security group- Acts
as a virtual firewall to control inbound and outbound traffic.
• An EBS volume- We
require a root volume for the image. You can optionally add data volumes.
Step 1: Launch an Instance
1. Open the Amazon
EC2 console at https://console.aws.amazon.com/ec2/.
2. In the navigation bar
at the top of the screen, we display the current AWS Region, for example, Ohio. You can use the selected Region, or optionally select a Region that is closer
to you.
3. From the EC2 console
dashboard, in the Launch instance pane, choose Launch instance.
4. Under Name and tags,
for Name, enter a descriptive name for your instance.
5. Under Application and
OS Images (Amazon Machine Image), do the following:
a. Choose Quick Start,
and then choose the operating system (OS) for your instance. For your first Linux instance, we recommend that you choose Amazon Linux.
b. From Amazon Machine Image (AMI), select an
AMI that is marked Free Tier eligible.
6. Under Instance type,
for Instance type, choose t2.micro, which is eligible for the Free Tier. In Regions where t2.micro is not available, t3.micro is eligible for the Free
Tier.
7. Under Key pair
(login), for Key pair name, choose an existing key pair or choose Create new
key pair to create your first key pair.
8. Under Network
settings, notice that we selected your default VPC, selected the option to use the default subnet in an Availability
Zone that we choose for you, and configured a security group with a rule that
allows connections to your instance from anywhere.
Step 2: Connect To Your Instance
- Linux instances- You can connect to your Linux instance using any SSH client. If you are running Windows on your computer, open a terminal and run the ssh command to verify that you have an SSH client installed. If the command is not found, install OpenSSH for Windows.
- Windows instances- To connect to a Windows instance using RDP, you must retrieve the initial administrator password and then enter this password when you connect to your instance. It takes a few minutes after instance launch before this password is available. Your account must have permission to call the GetPasswordData action.
Step 3: Clean Up Your Instance
After you've finished with the instance that you created, you should clean up by terminating the instance. You'll stop incurring charges for that instance or usage that counts against your Free Tier limits as soon as the instance status changes to shutting down or terminated. To keep your instance for later, but not incur charges or usage that counts against your Free Tier limits, you can stop the instance now and then start it again later. After your instance is terminated, it remains visible on the console for a short while, and then the entry is automatically deleted. You cannot remove the terminated instance from the console display yourself.
Next Steps
After you start your instance, you might want to explore the following next steps:
• Explore the Amazon EC2 core concepts with the introductory tutorials.
• Learn how to track your Amazon EC2 Free Tier usage using the console.
• Configure a CloudWatch alarm to notify you if your usage exceeds the Free Tier.
• Add an EBS volume.
• Learn how to remotely manage your EC2 instance using the Run command.
• Learn about instance purchasing options.
• Get advice about instance types.


Comments
Post a Comment