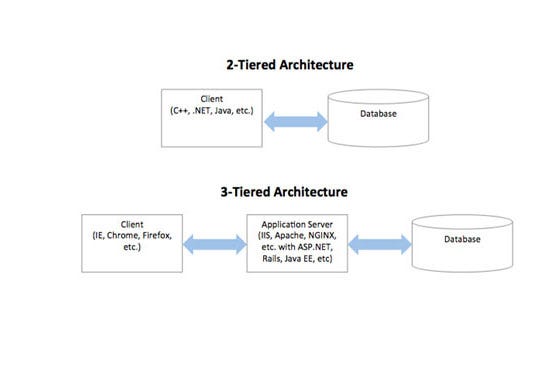
Single-instance Implementations (2-tier or 3-tier)
Overview
- Use SAP Software Provisioning Manager (SWPM) as a part of the standard (2-tier) or distributed (3-tier) NetWeaver installation, followed by HANA installation.
- Use the SAP HANA database lifecycle manager (HDBLCM) tool, and then install NetWeaver.
The installation can start by an ASCS instance and the /sapmnt share, which have the SAP profile directory, should be shared with the SAP DB server VM. Depending on the OS of the DB server, the best way to provide access is via either SMB or NFS.
The /sapmnt is shared via NFS while using Linux OS with the help of rw and no_root_squash options which may lead to problems while installing the database instance. Finally, the installation provisions the primary application server instance and after this is installed, you can easily use the tools like SAP GUI to verify that the installation finished correctly or not.
Key steps for SAP HANA installation when you use SAP SWPM
- Create an Azure virtual network.
- Deploy two Azure VMs with the help of Azure Resource Manager deployment model.
- Attach standard or premium data disks to the application server VM.
- Attach premium data disks to the HANA DB server VM.
- Create striped volumes using the attache disk. You can use either Logical Volume Management (LVM) or the multiple-devices administration (mdadm) tool inside the VM at the OS level.
- Create XFS file system on the attached disk or logical volumes.
- Mount the new volumes at the OS level by using separate volumes for the SAP binaries, /sapmnt directory, and backups. You should mount the XFS file systems on the premium storage disks as /hana and /usr/sap on the SAP HANA DB server which would prevent the filling up of root file system that isn't large on Linux AzureVMs.
- Add entries representing Azure VMs to the /etc/hosts file.
- Add the nofail parameter to the /etc/fstab file.
- Set Linux kernel parameters according to the Linux OS release you use.
- Add swap space.
- Optionally, install a graphical desktop on the test VMs or use a remote SAPinst installation.
- Download the SAP software from the SAP Service Marketplace.
- Install the SAP ASCS instance on the app server VM.
- Share the /sapmnt directory using NFS whose server is the application server VM.
- Install the database instance by using SWPM on the DB server VM.
- Install the Primary Application Server (PAS) on the application server VM.
- Start SAP Management Console (SAP MC) and connect it with SAP GUI or HANA studio.
Key steps for SAP HANA installation using HD-BLCM
- Create an Azure virtual network.
- Deploy two Azure VMs with the help of Azure Resource Manager deployment model.
- Attach standard or premium data disks to the application server VM.
- Attach premium data disks to the HANA DB server VM.
- Create striped volumes using the attache disk. You can use either Logical Volume Management (LVM) or the multiple-devices administration (mdadm) tool inside the VM at the OS level.
- Create XFS file system on the attached disk or logical volumes.
- Mount the new volumes at the OS level by using separate volumes for the SAP binaries, /sapmnt directory, and backups. You should mount the XFS file systems on the premium storage disks as /hana and /usr/sap on the SAP HANA DB server which would prevent the filling up of root file system that isn't large on Linux AzureVMs.
- Add entries representing Azure VMs to the /etc/hosts file.
- Add the nofail parameter to the /etc/fstab file.
- Set Linux kernel parameters according to the Linux OS release you use.
- Add swap space.
- Optionally, install a graphical desktop on the test VMs or use a remote SAPinst installation.
- Download the SAP software from the SAP Service Marketplace.
- Create a group, sapsys, with group ID 1001, on the HANA DB server VM.
- Install SAP HANA on the DB server VM with the help of HANA database lifecycle manager.
- Install the SAP ASCS instance on the app server VM.
- Share the /sapmnt directory using NFS whose server is the application server VM.
- Install the database instance by using SWPM on the DB server VM.
- Install the Primary Application Server (PAS) on the application server VM.
- Start SAP Management Console (SAP MC) and connect it with SAP GUI or HANA studio.
Implementing SAP HANA Scale-out
- Create new or use an existing Azure Vnet.
- Deploy VMs with managed Sremium storage disks.
- Deploy new or use an existing highly available NFS cluster.
- Validate that intra-node communication as well as traffic between the VMs and highly available NFS cluster is not routed through an NVA.
- Install the SAP HANA master node according to the SAP's documentation.
- After the installation, you can add the parameter 'basepath_shared = no' to the global.ini file which allows SAP HANA to run in scale-out without 'shared' /hana/data and /hana/log volumes between the nodes.
- After changing the global.ini parameter, you can restart the SAP HANA instance.
- Add additional worker nodes.
The scale-out configuration will use non-shared disks for running /hana/data and /hana/log while the /hana/shared volume will be placed on the highly available NFS share.


Comments
Post a Comment